Products | Mixed Reality |
REALITY IN VIRTUAL OUT
rivo |
product designer |
hololens |
product name
role
hardware
rivo | product name
product designer | role
hololens | hardware
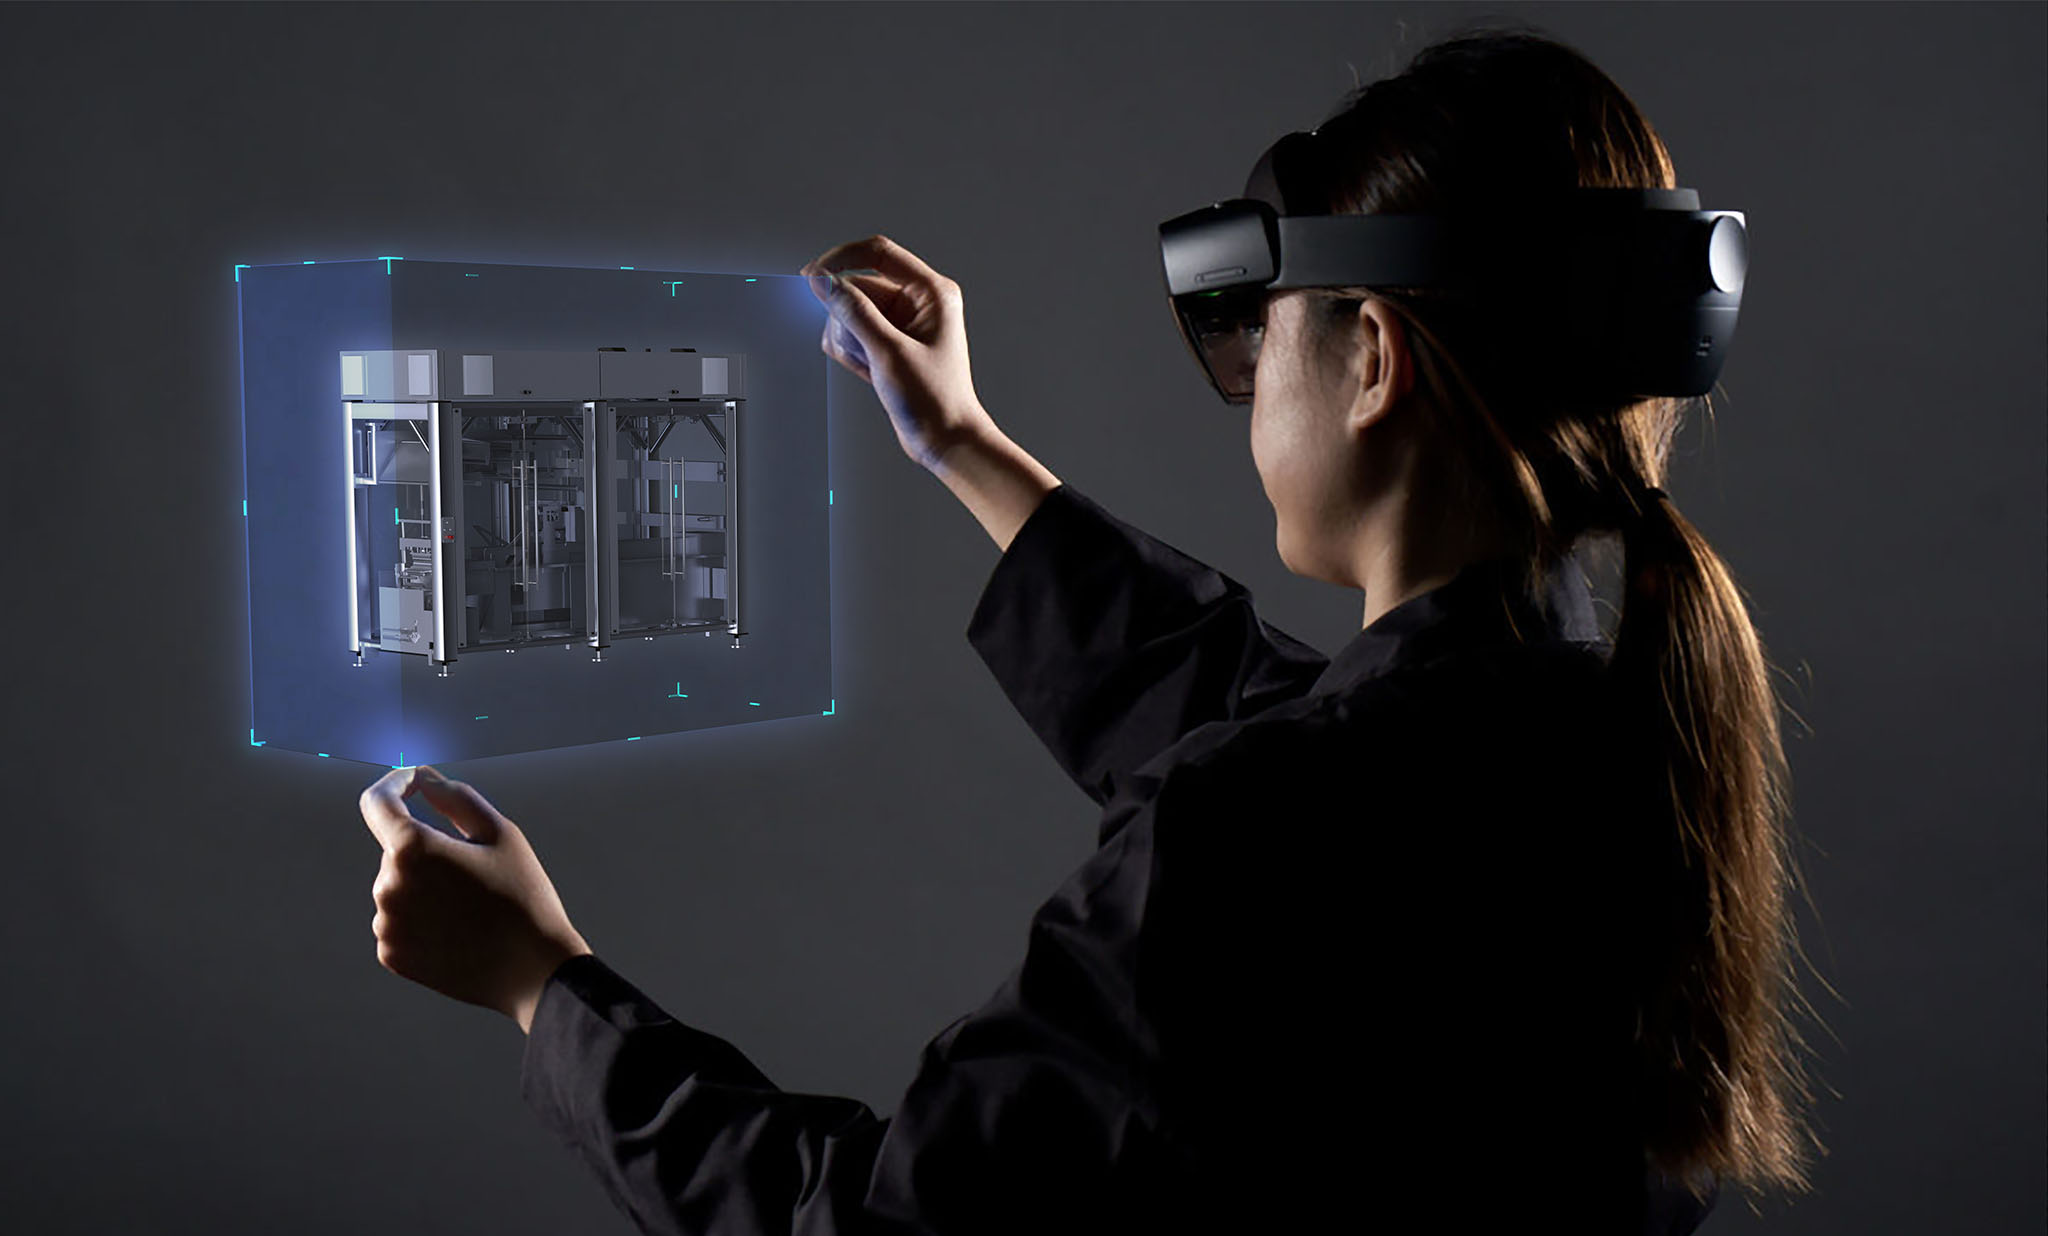
Digital twin - Crisp Packing machine
Responsibilities
- Lead Designer
- User Research
- Prototype Tester
- Information Architecture
- Wireframes
- User Interface Design
- Animations/Interactions
- Voice User Interface (VUI)
Challenge
To obtain Microsoft partner status, we had three months to create full mixed reality application with a tight knit development team. The project involved using a Microsoft HoloLens headset for PepsiCo factory engineers to help machine maintenance & onsite remote training. It uses Holograms overlaid in real world factory environments
RESEARCH |
CURRENT TRAINING PROCESS
Liasing with Pepsico and Redpack (factory machine manufacturer) –allowed me to get information and research about training users. There where training documents and videos to accompany the machine which I researched in detail to fully understand the machine operation and training given.
The main routine training task was to help the machine operator when changing the packing film, so this part of the training was scrutinised to be fully understood. As the solution was a 3D environment interface a CAD model of the flexwrap was also requested to allow us to start understanding the film wrapping machine and how it functioned.
All safety procedure where noted, so that our mixed reality solution didn’t put anyone in danger as this was of paramount importance.
I conducted research into existing applications on the Microsoft Store to gauge an understanding of best practices of the official Microsoft applications that had been released. Studying and researching 3D spatial interfaces and how best to use certain elements was key to creating a fully functional and great user experience. Being restricted to only one hand gesture of air tapping to navigate the applications interface would prove challenging!! The HoloLens is a prototype piece of hardware so there is very little guidance as to best practices, so we had to do multiple tests and research to find out what interface patterns and elements would suit our needs for the product and our end users.
CONCEPTS / IDEAS / FLOWS
USER JOURNEY
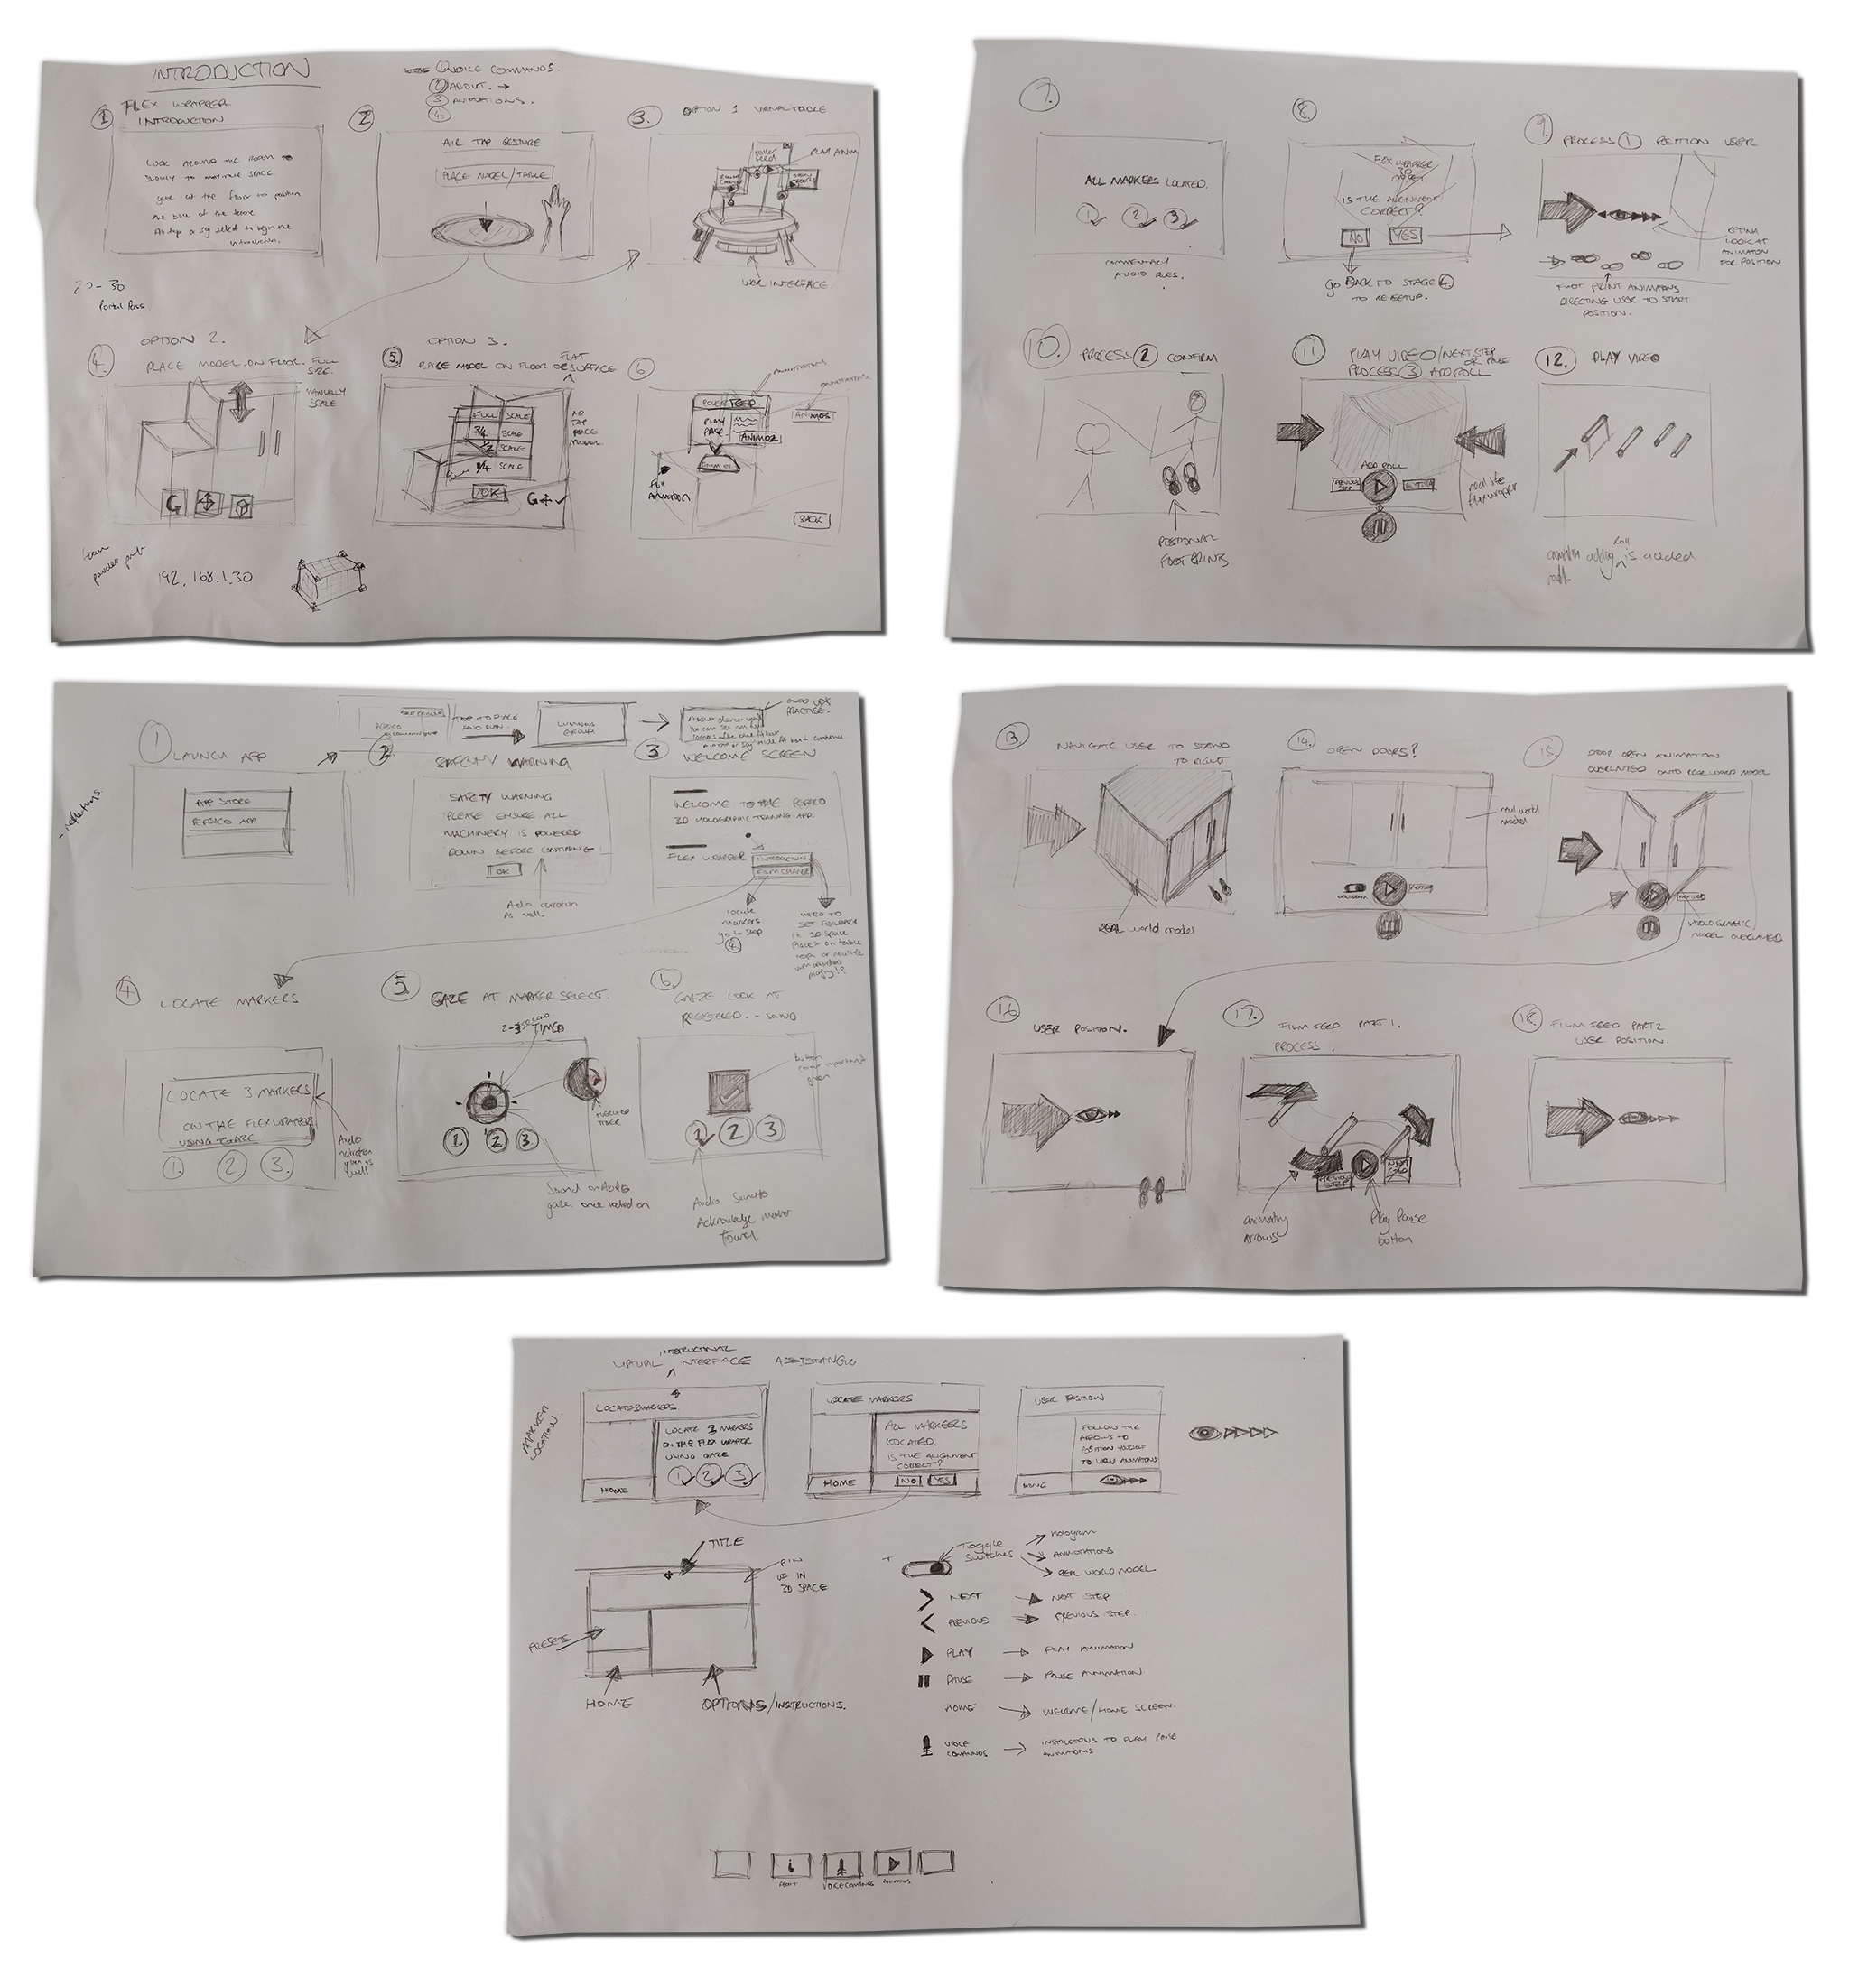
To quickly concept ideas I sketched storyboards that would explain the key user interface elements and help understand the 3D interface logic that would be needed to implement the design.
After reviewing the rest of the team and the developers some tweaks and modifications where made, this formed a basic plan of how the initial prototype would be built.
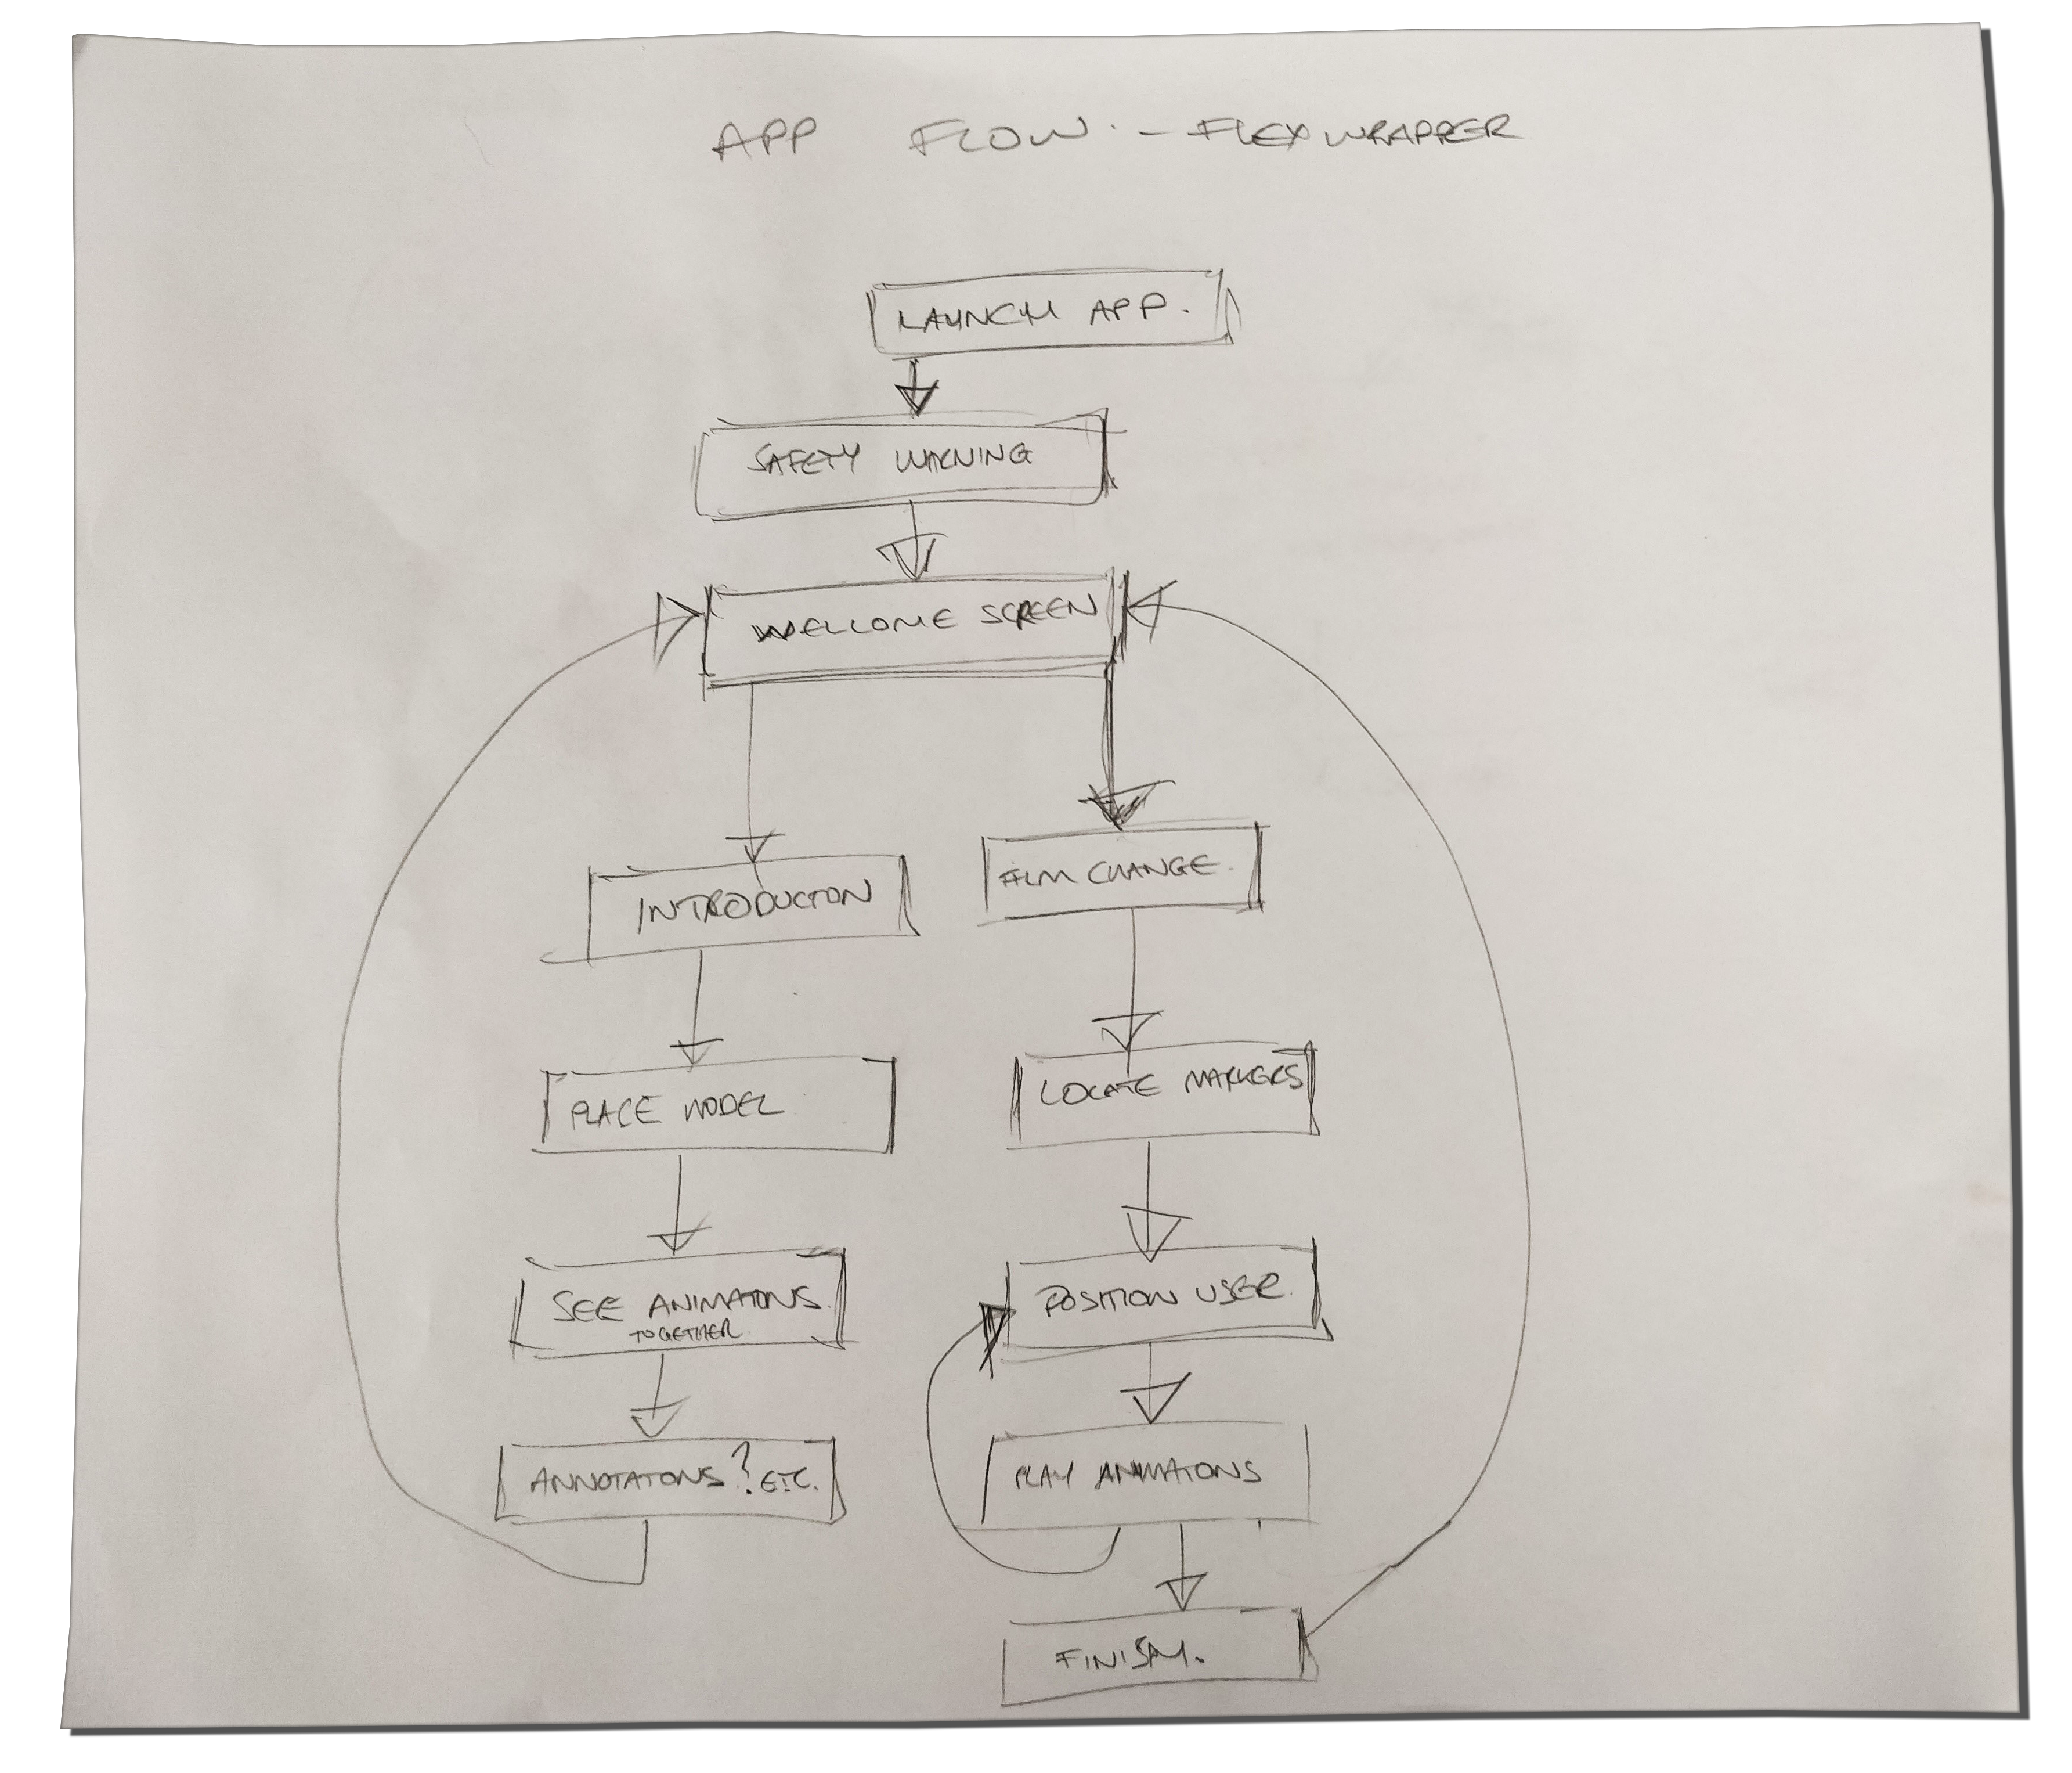
Showing the journey a user would take starting the app to a basic introduction to locating QR Marker codes
Sketching the flows above helped me quickly understand the core functionality of the app, which was then easy to relay back to the development team for review.
AUGMENTED REALITY
After sketching out several ideas and prototyping some basic concepts it was decided we would use a spline based UI rail that anchored itself to the waist height of the user and around the Flexwrap machine, this meant the UI was never lost behind the machine and the UI elements would always face the user as they walked around the machine.
One of the biggest constraint with the HoloLens is the primary navigation hand gesture called the ‘Air Tap’ is the only way a user can confidently navigate through the app. This involves a cursor projecting from your line of gaze, this cursor acts like a mouse cursor then to activate a selection the ‘Air Tap’ gesture must be used. There where experiments done with navigating the application with a timed gaze action (ie gazing at a button for a certain period of time) it would be activated. After user testing prototypes this proved awkward and cumbersome with unexpected selections. The ‘Air Tap’ proved the safest way to for the user navigate around the application with confidence.
VOICE USER INTERFACE DESIGN (VUI)
Once the sketches where reviewed it was a good stepping stone as to what interface elements and information would be needed to communicate to the user, for their ideal journey.
I then took the 3D CAD model and brainstormed how the user would interact with the training elements which would be overlaid onto the real world Flexwrap machine in Augmented Reality.
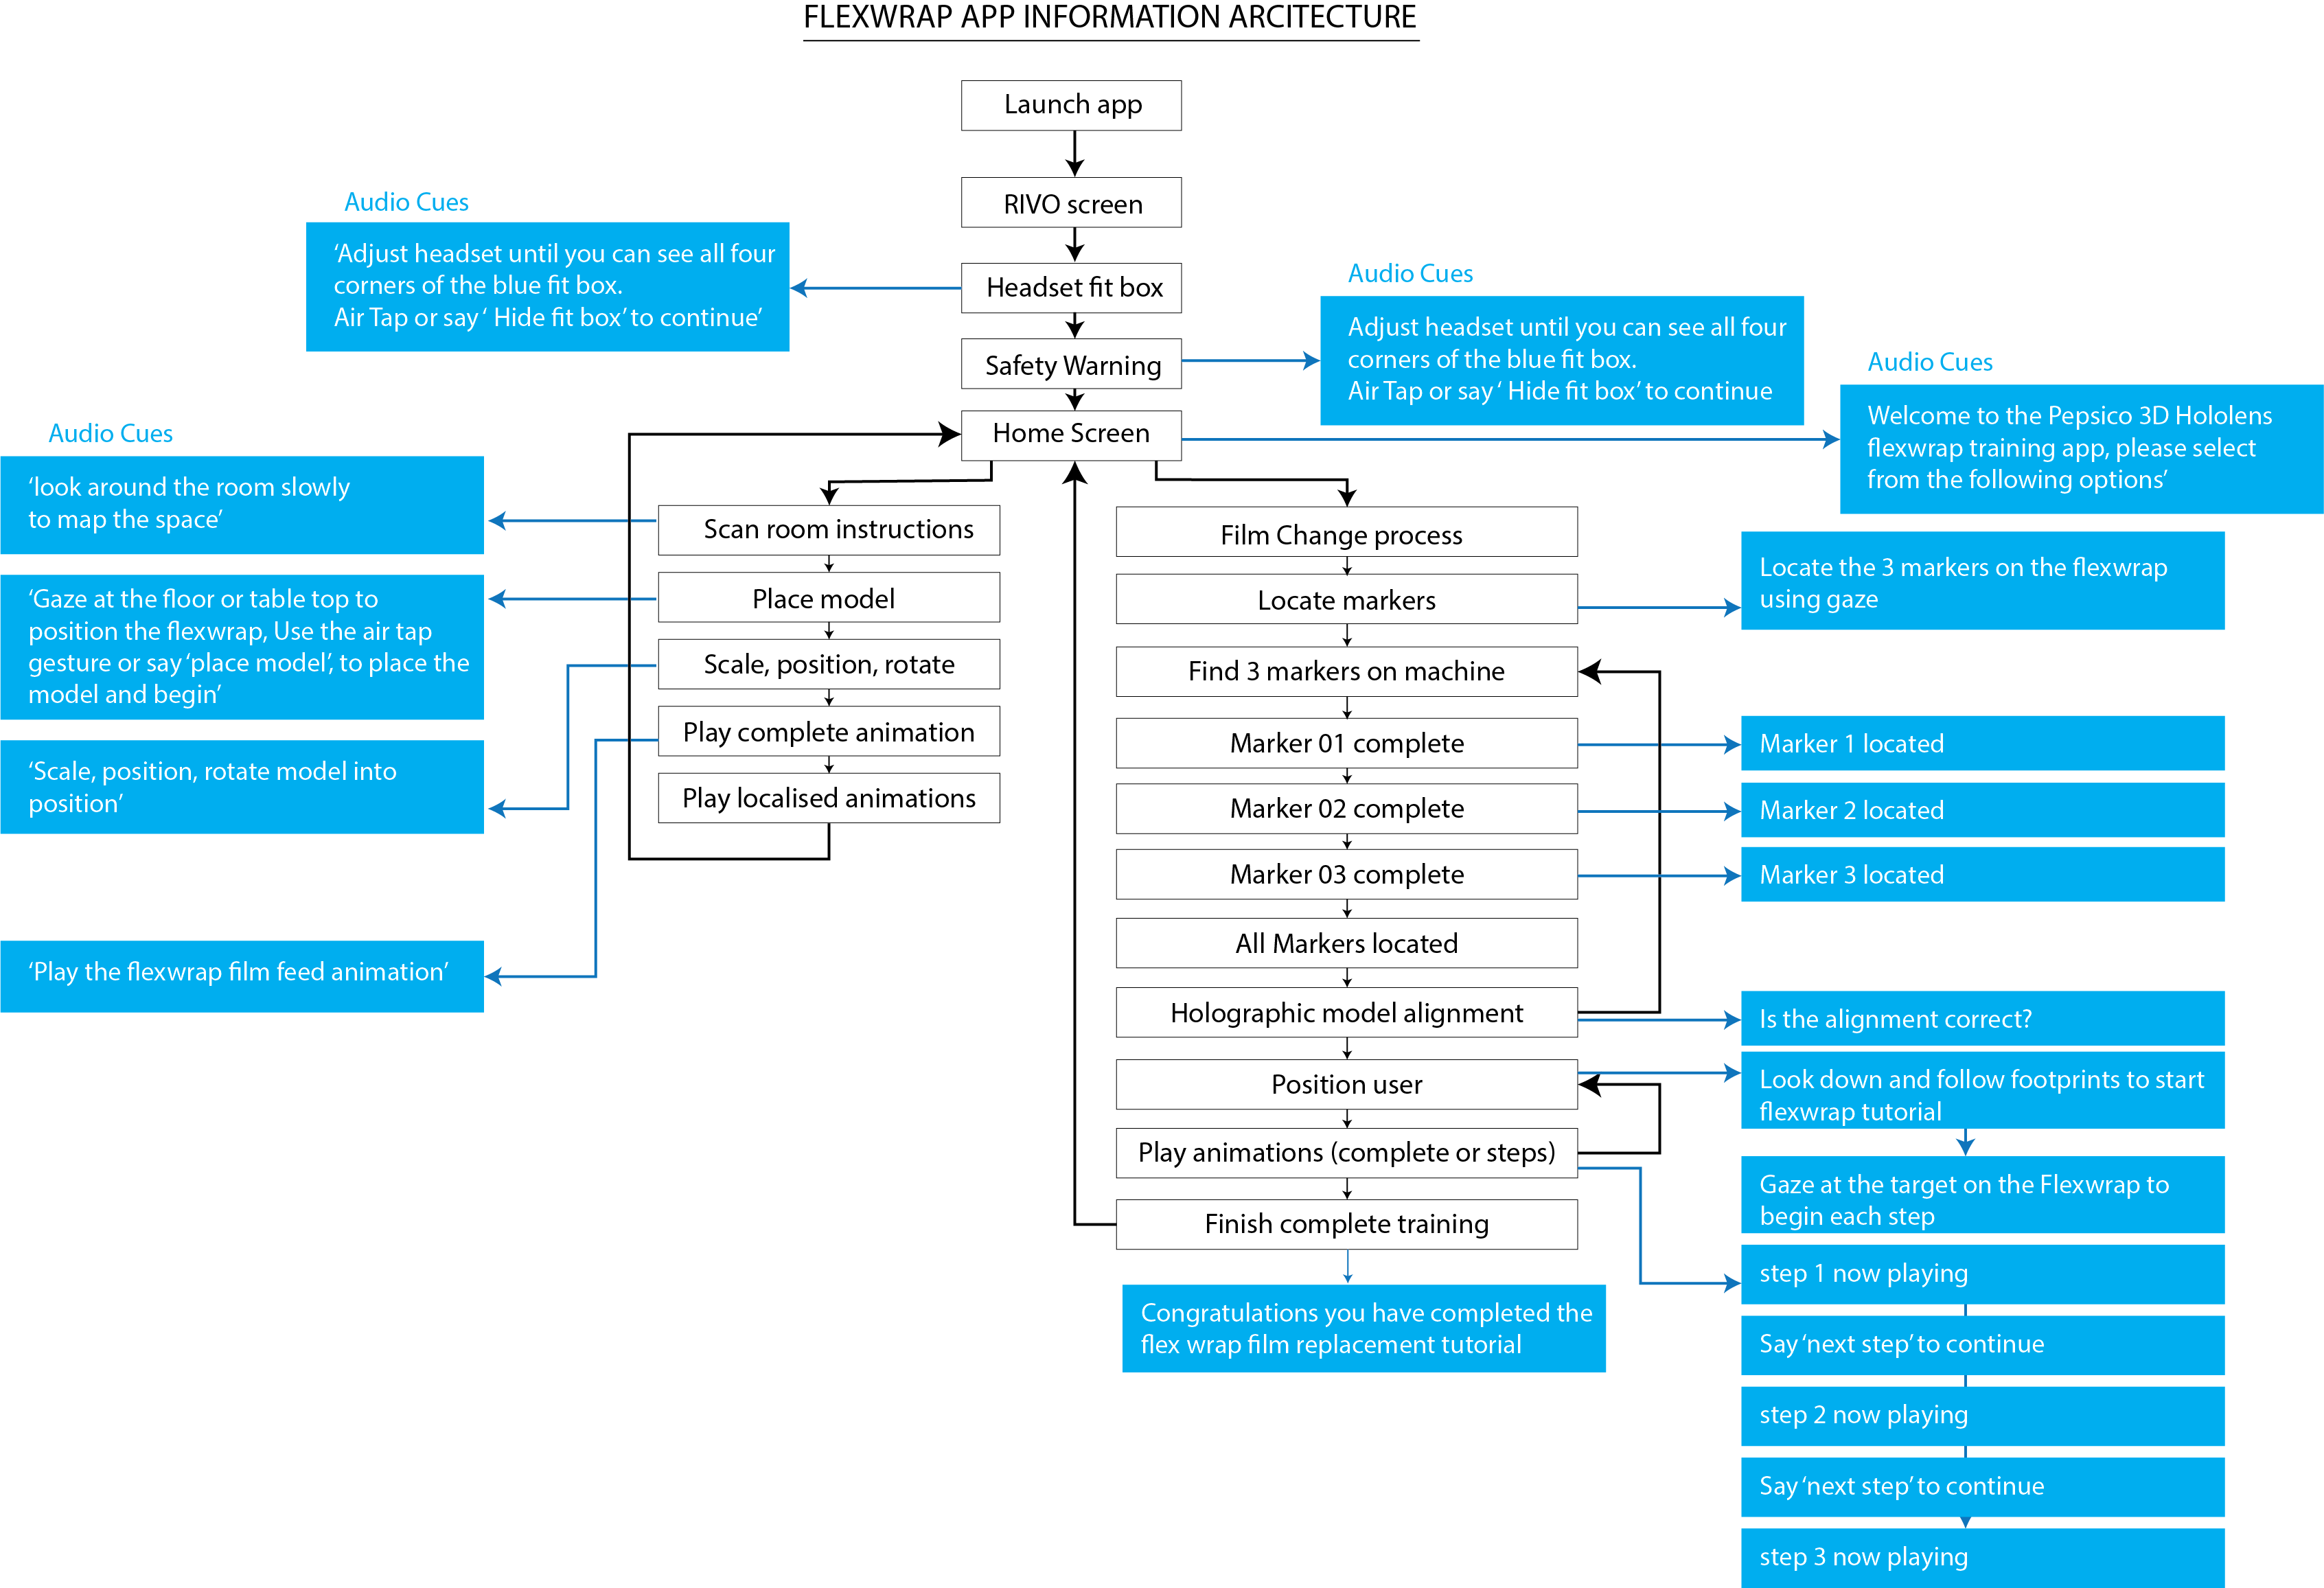
'Signed off' Information Architecture – with voice cues
It was clear at this point the app was going to contain two main elements the first element was the Introduction and the second was the film changing processes for machine maintenance.
INTRODUCTION
The Introduction is about viewing the Flexwrap model out of context and being able to position it anywhere in a 3D environment. Once the machine was anchored in the real world you would then be able to:
- Scale
- Rotate
- Move (Multi-Directional)
The user was then able to progress onto the next part of the app, which was to show the training steps for the film change.
The training animation was broken into six key steps so they user could easily return back to a point in the animation without having to go back to the start.
There is a pre-recorded voice over explaining the step by step process in a clear defined way, that is perfectly timed with the visual 3D animation. Doing this meant the Flexwrap model could be easily viewed without having the full size machine infront of the user.
FILM CHANGE
The actual real life overlaying of the animation training sequence was a bit more tricky to setup as we needed to use spatial anchors to position the 3D animation sequence correctly over the top of the full size machine. To enable the user to do this we added 3 unique QR code markers onto the Flexwrap machine, using Vuforia AR each marker had its own distinctive features so it was correctly identified. Once the user started the process of carrying out the film change process they are requested to locate three QR code markers on the Flexwrap machine, this involved using the HoloLens camera to lock onto the position of the markers, once all the markers are located on the Flexwrap, the user is then guided to the start position which is the most optimised position to view the training animations.
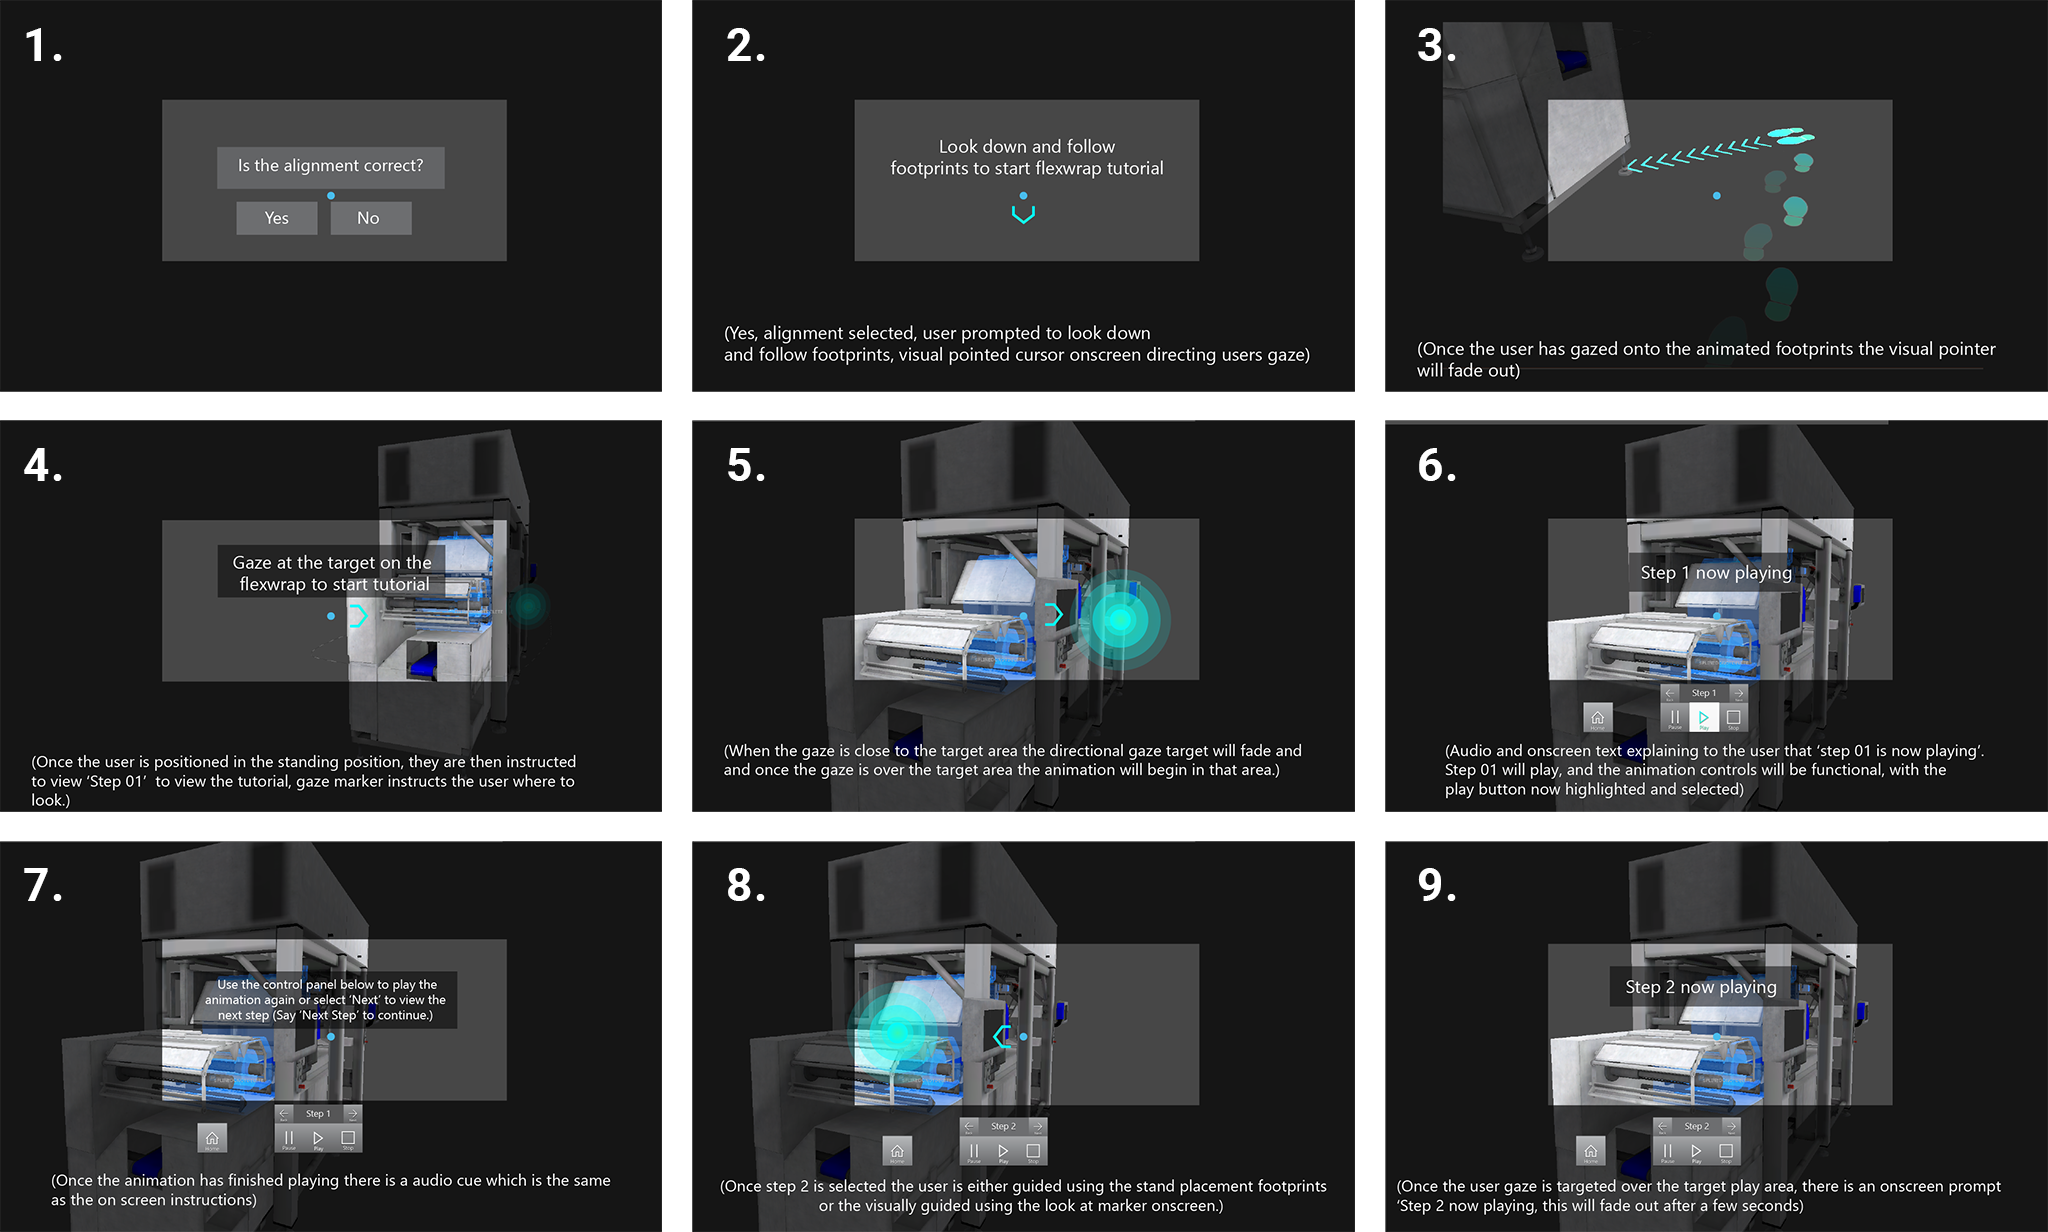
Initial 3D concept with user journey and placeholder UI elements

Animation to reveal the flexwrap with sound FX for placing the model
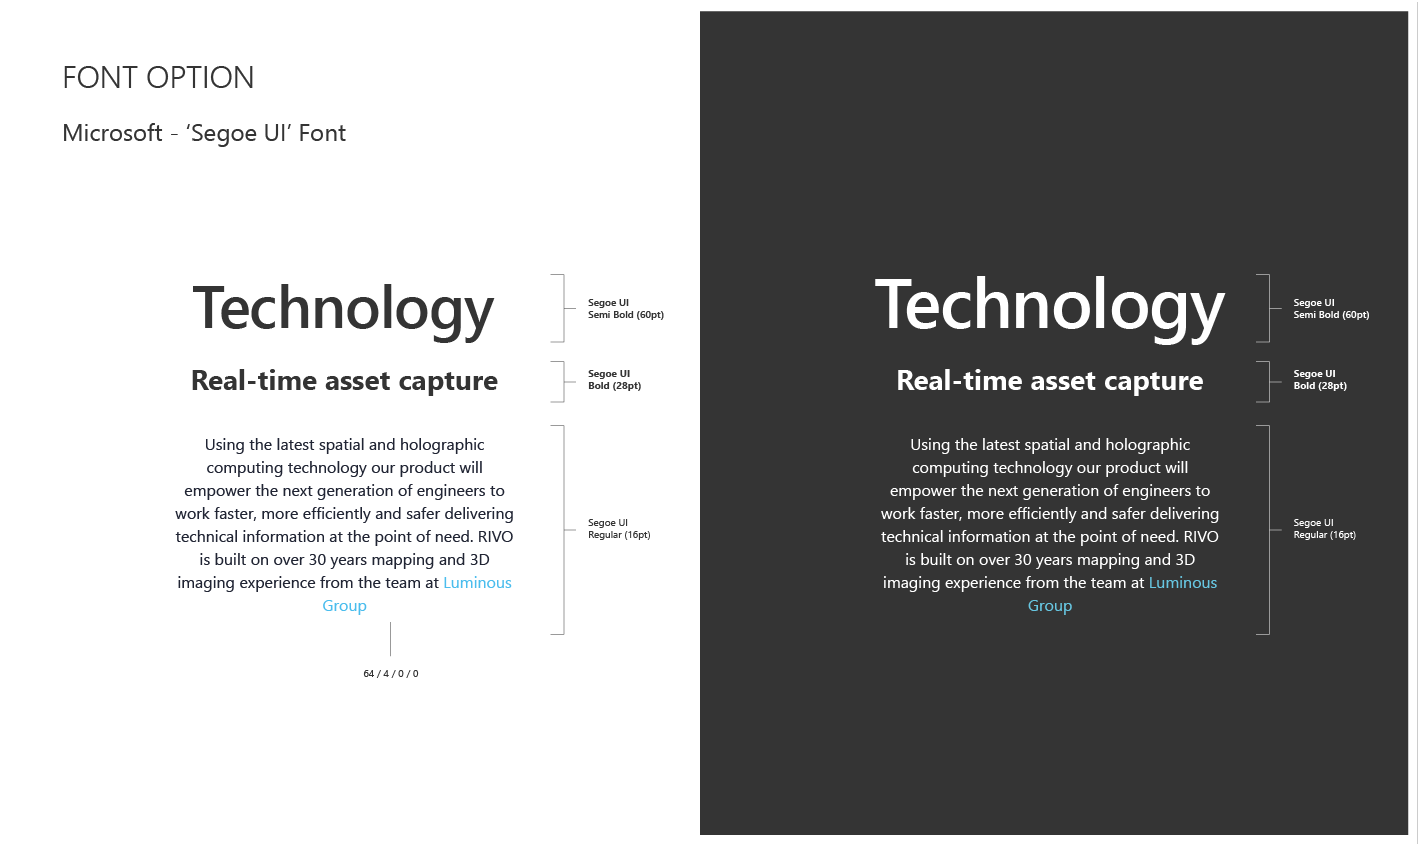
FONT OPTIONS
Desktop Icons - Design System
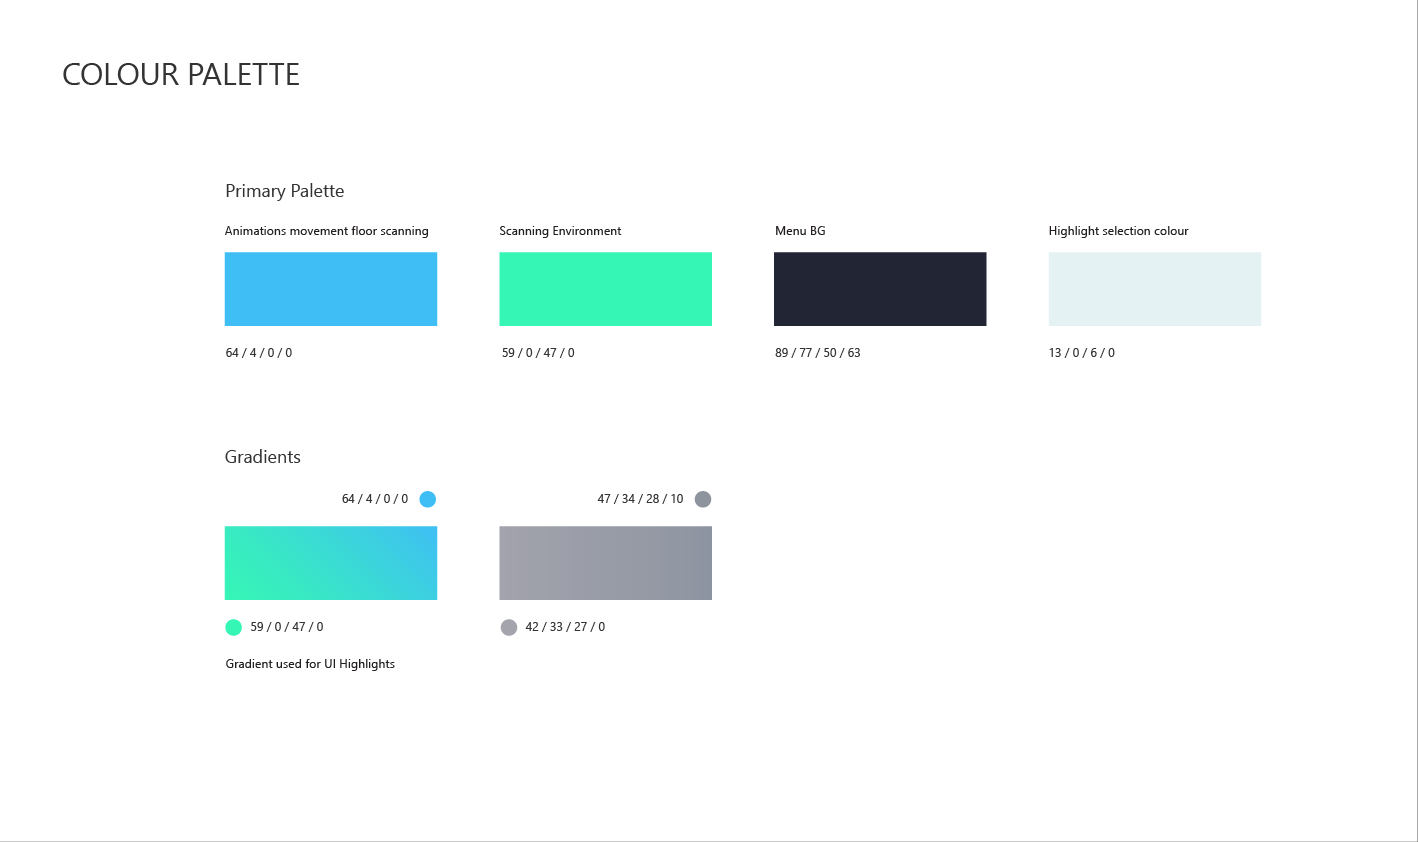
COLOUR PALETTE
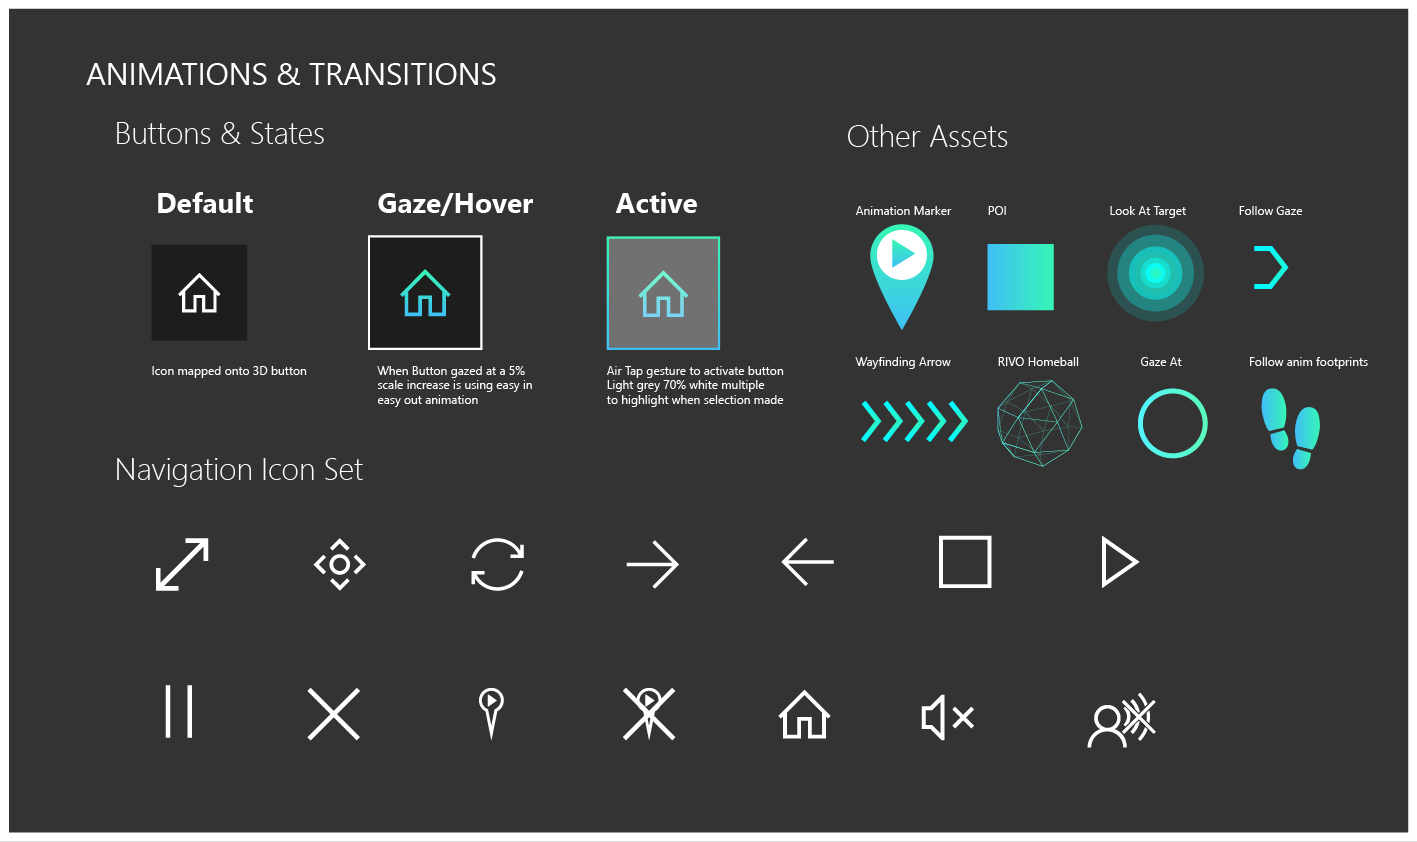
ICONS & ASSETS
FLEXWRAP VIDEO ONSITE
Actual HoloLens 1 in headset – Recorded Footage – See the multi-pack crisps film packaging being loaded into the Flexwrap Machine in Mixed Reality (Holograms) Training
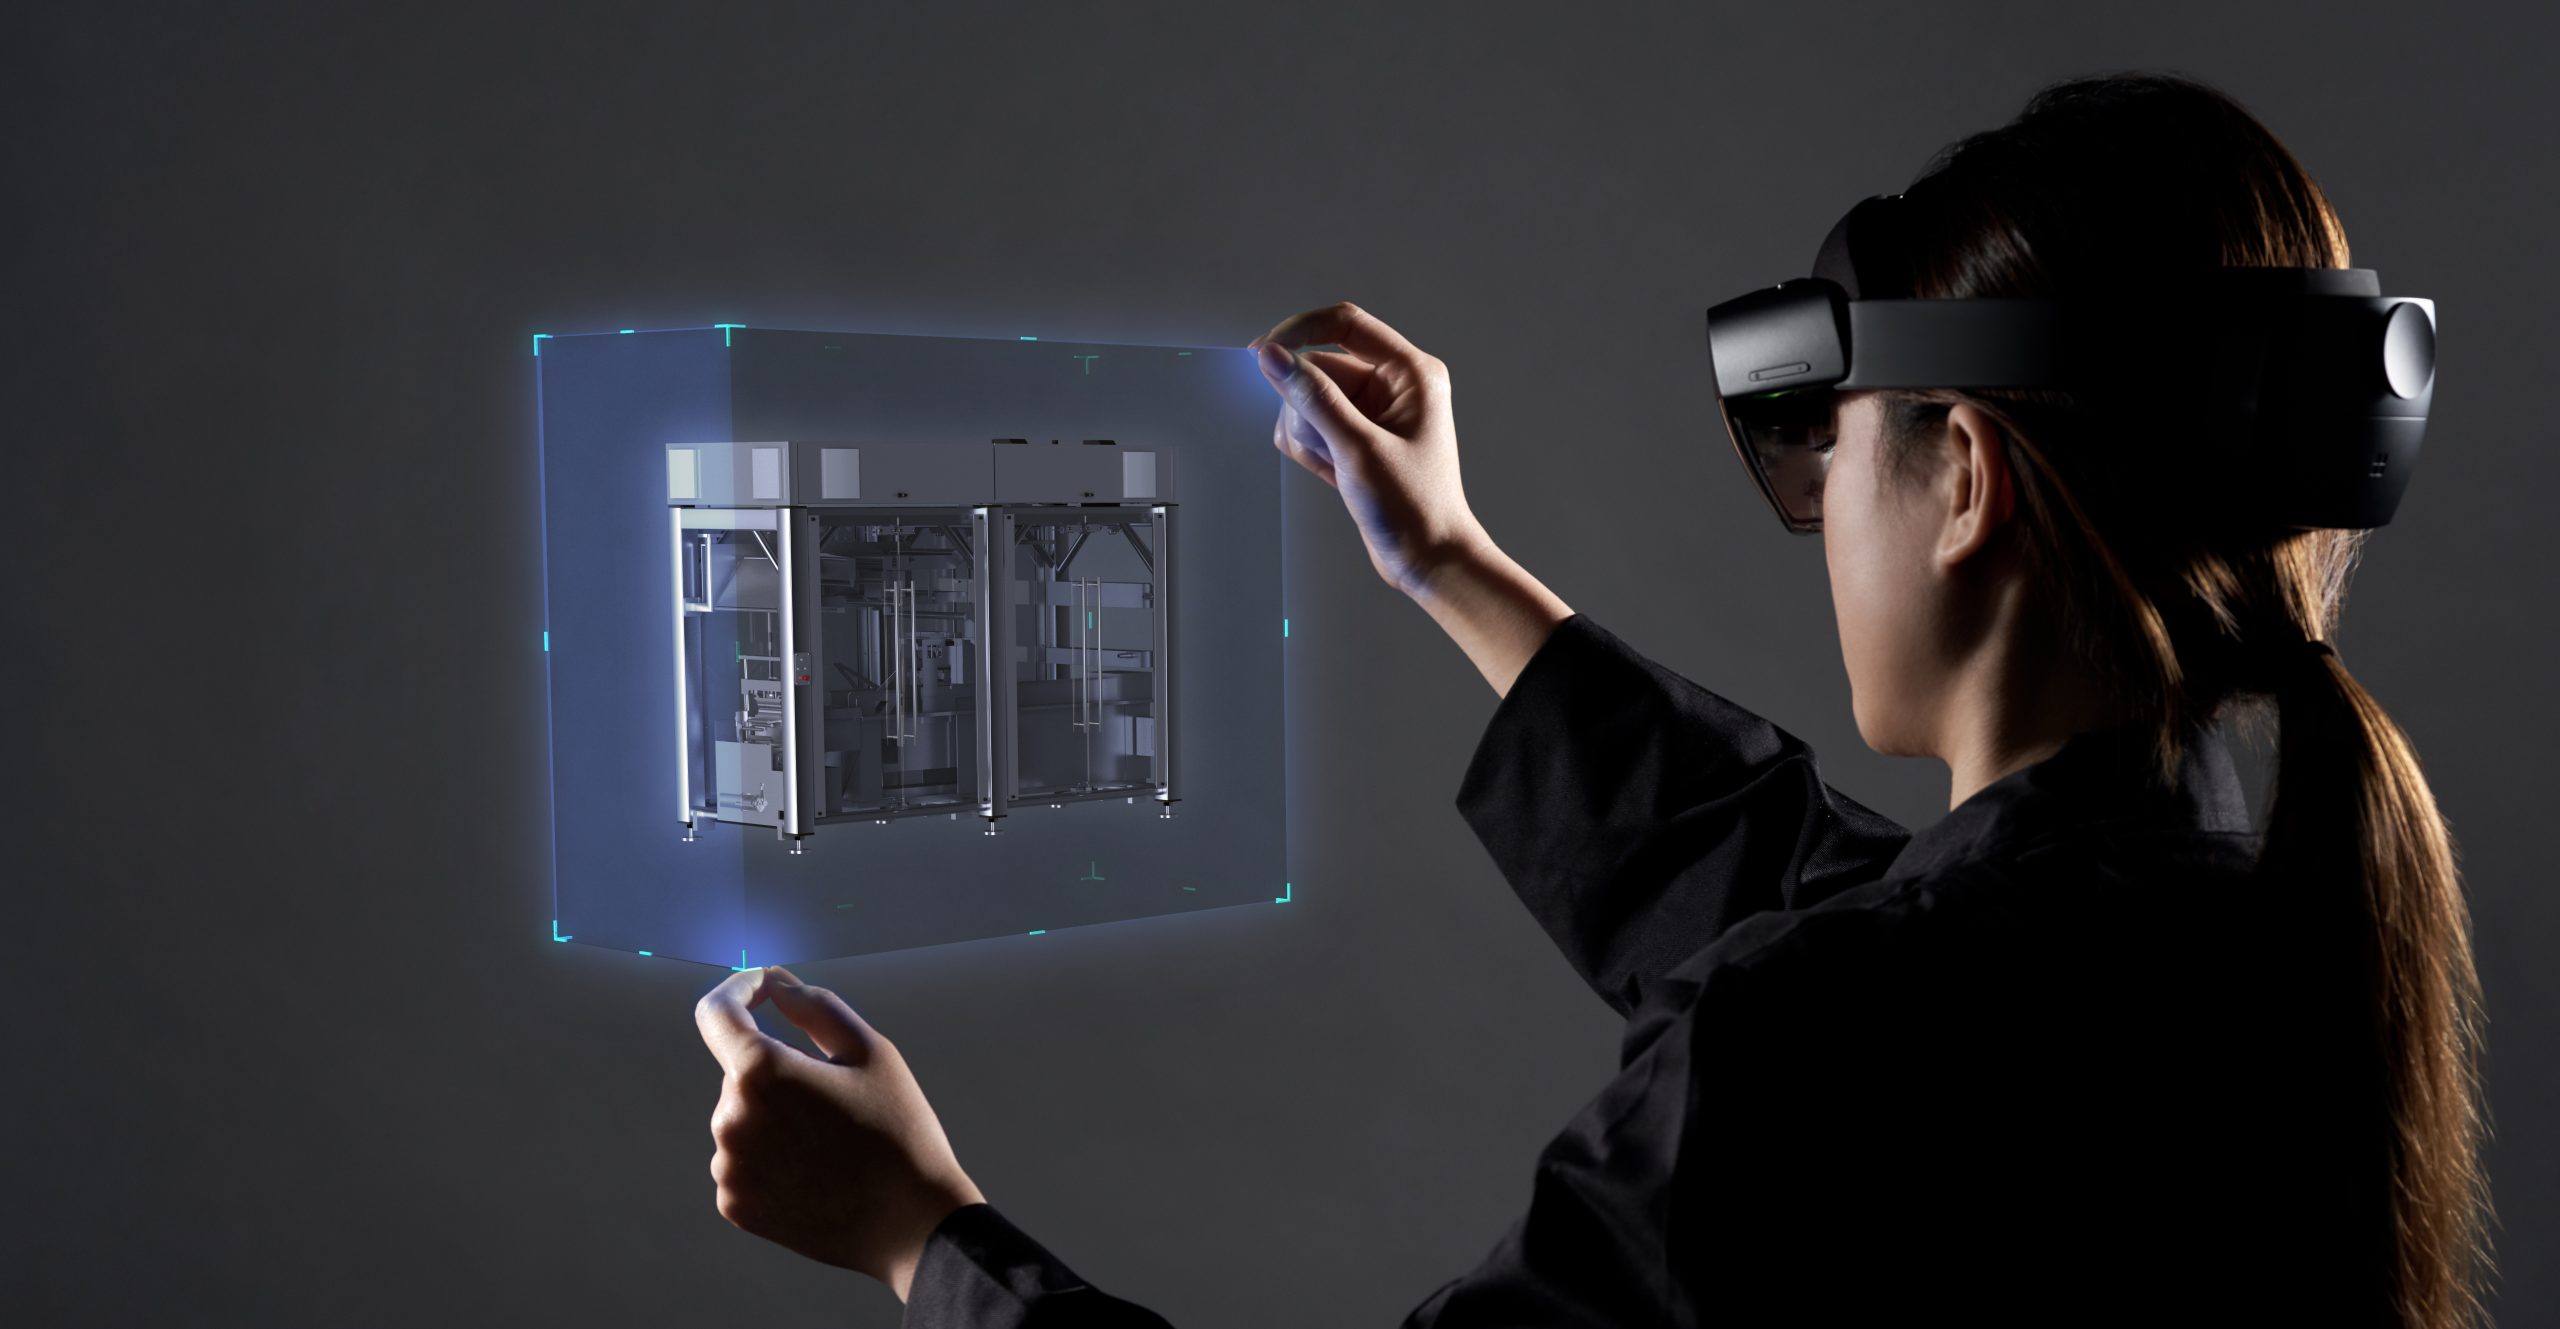
USER INVESTIGATING AND PLACING THE 3D MODEL/MACHINE
LESSONS LEARNED |
PERFORMANCE TESTING
It was critical to try and hit 60FPS with the app as when complex shaders and lots of geometry where introduced there where significant performance issues. When the frame rate of the app drops under 40 FPS there was noticeable latency which led to nausea for the user, so aiming for 60FPS was the teams benchmark to achieve a comfortable experience for the user. To achieve this we used optimised shaders, geometry, limited objects and other code optimisations.
INTERACTIONS
With such a quick turn around project, there wasn’t much time to do user interaction testing. With the HoloLens being a new 3D paradigm, it meant there was a lot of unknowns as to how a first time user would respond to certain interaction inputs, animations, 3d buttons, transitions, noises, FX and voice commands. So very quick rapid prototyping and 3D practical experiments where needed to test, using cardboard cut outs and boxes placed in areas helped understand how the user could best interact alongside physical objects and UI elements. The ‘air tap’ interaction of the Hololens can prove difficult for some people, so initial good people management training was important for first time users to understand this new paradigm.
HOLOLENS FIELD OF VIEW
Although the HoloLens 1 was a cutting edge piece of hardware, it is only a prototype!! one of the biggest constraints is the field of view (FOV) as this is quite restricted in the headset. The challenging problem was to keep the users gaze and attention focused on the task in hand. Using look at 360 floating cursor arrows for viewing points of interest was invaluable. For positioning users for optimised viewing angles during training, animating footprints, specific targets on the ground and POI also proved useful to keep the user engaged with a limited FOV.
AUDIO FX
Overuse of sound effect and voice overs proved irritating after several uses, so in future to be optimal with voice over instructions and voice cues, as this damaged the UX in some areas of the app, and we added an option to turn of voice instructions. Also being very subtle with sound FX for button hover and selection states as its important to let the user know they have input certain commands, but over use can destroy the user experience of the training application.
VOICE COMMANDS
Voice commands where added to all the navigation buttons in the app, they popped up when the user button gazed for more than 0.5 seconds. The issues we had was the working area of the Flexwrap in the factory was very noisy and loud and the HoloLens mic struggled to register user voice commands. The HoloLens 2 however has directional microphones that pick up sounds from the user with any loud ambient noise around, apparently!!! (This needs to be tested as I’m still convinced VCs would work in a loud factory environment that the Flexwrap was in!!!) More testing in the factory environment would have been useful, to not waste valuable development time, on certain features
USER TESTING
User testing was so important throughout the development life cycle, this allowed us to tweak and modify certain task procedures in order to fit with the technology, in the most simplistic, user efficient way.
